Before you take pictures...
|
Chong Ho Yu (Alex) |
Many people just bring their camera and go out to shoot pictures. A proper preparation is a must for taking good photos! Can you imagine that a soldier goes to a battle field without checking his machine gun first? I always do the following before any photographic assignment:
Checking batteries and the contact points
Some older film-based cameras use the battery to power the meter only. Some hybrid film-based cameras can switch to the manual mode while the battery runs out. But all digital cameras totally rely on battery power. The battery can burned out very quick if your camera has a built-in flash. If the battery is dead, you cannot do anything with the camera. Needless to say, it is important to test the camera's battery before leaving your home.
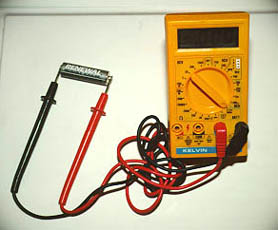 Some AA batteries have
a built-in battery tester but some do not. For the latter, you need a hand-held battery tester as shown in the right picture. To test the battery, you should adjust the dial to 1.5 volts, and then place the two pins of the tester to the two
polarities of the battery.
Some AA batteries have
a built-in battery tester but some do not. For the latter, you need a hand-held battery tester as shown in the right picture. To test the battery, you should adjust the dial to 1.5 volts, and then place the two pins of the tester to the two
polarities of the battery.
In theory, you should attach the positive end of the battery with the positive pin and the negative end with the negative pin. Actually, it doesn't matter. Even if the contact points are wrong, neither the battery nor the tester would be hurt. Although the reading is negative with the reversed connection, you can omit the "-" sign and read the absolute value only. If the voltage is 1.4 and above, you can keep the battery, otherwise replace it or recharge it.
To test your lithium battery, read the voltage printed on the battery first. Then adjust the dial on the tester. It is important note that when you test some lithium battery using the setting as 1.5, the number "1.8" may flash in a spilt-second on the LCD panel, and then it drops to "1." Don't worry. The battery is fine. This happens because the tester cannot read the super-charged lithium battery.
Even though you are sure that all your batteries are fully charged, you should always take spare batteries with you. A camera with a built-in flash or a separate flash consumes batteries quickly. Most modern flashes use thyristor technology, which can significantly reduce the recycling time. However, if the flash needs more time to recharge itself, you should replace the battery with your spare right away. You don't want to lose a good shot just because the flash is not ready.
On some occasions you may be frustrated by the riddle that the camera keeps telling you that the battery is low even if it is fully charged. Chances are the contact points of the battery holder in the camera are dirty. The problem can be resolved by using an eraser stick to brush the contact points.
Cleaning lenses and sensor:
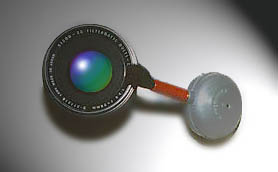
What a disaster when you shoot a good picture with a dirty lens! Before you take pictures, clean all your lens and filters first. However, some popular ways of lens cleaning may harm rather than helping your lens. Avoid cleaning tissue. Some tiny tissue may leave on the lenses. Avoid liquid-based cleaner. It may damage the multi-coating of the lens. I recommend using a dust blower only as shown in the left picture.Cleaning the sensor is a bit tricky. You should avoid using a duster made of compressed air. The strong air flow may loosen the structure of the sensor or other components inside the camera. It is advisable to use a mini-vacuum, such as Green Clean, which extracts particles out of the camera instead of blowing air into it.
After cleaning both the lenses and the sensor, you should look though the viewfinder to see if the view is clear. If it is not clear, perhaps the viewfinder or the flip mirror is dirty. When you clean the mirror, hold the camera up and let the mirror face the ground. If your camera lays on the table and faces up, loose dust may go back to the camera body.
All papers and graphics in these Webpages are created and copyrighted by
Dr. Chong Ho (Alex) Yu.
Navigation
Index
Simplified Navigation
Table of Contents
Search Engine
Contact